In each of the lessons, you can click on this top logo to go to the index of lessons
Lesson 1: The Keyboard
This lesson introduces you to the keyboard - which can be any instrument
that uses a piano-style keyboard: an organ, a synthesizer, an accordion,
a xylophone... for this course, we assume that you will have some sort
of keyboard you can use to play along with the examples. If you don't,
there are many inexpensive keyboards you can use for this course - I
really recommend using a keyboard with full size keys.
.
If you did not yet read the Introduction lesson yet, please go do that
now. That is where I explain how to play the audio clips in each lesson,
and what to do if the "player" doesn't show up for you or doesn't
actually play the clip. There is some other information in that lesson
that will be important throughout the course.
.
So... I'm sure it looks like there are an awful LOT of audio clips to
listen to, but each one is short and just covers one topic - I made lots
of audio clips to make it easy for you to listen to a clip again if you
didn't quite get what I was talking about in the clip. Each time you
click a button to play an audio clip, the material from the course book
that goes with that audio clip shows up right below the "Play" button.
.
.
.
.
RM102
.
Click the "play" button (right-facing arrow) to play the first audio
clip, which begins your introduction to the keyboard. Once again,
if you're not seeing the audio controls, you can click the "Play
Audio Clip" button to bring up the audio in your default audio player.
.
.
.
RM103
.
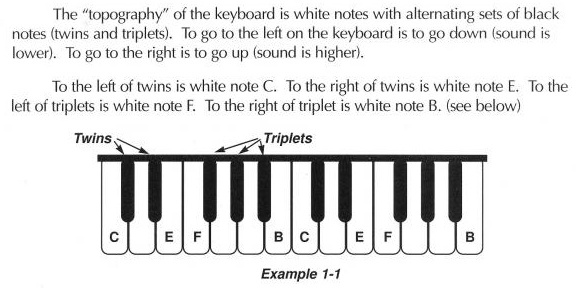
Play this clip to learn about the "Twins" and the "Triplets" on the
keyboard - how the layout of the keyboard can help you find the C, E,
F and B notes.
.
.
.
RM105
.
Play this clip to learn a little jingle I wrote to help you remember
the names of the notes next to the Twins and the Triplets.
.
.
.
RM107
.
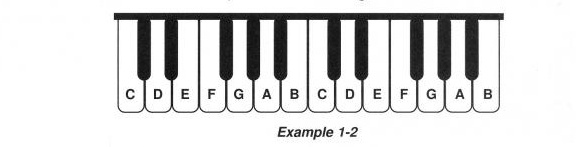
Play this clip to learn about the names of all the white keys on the keyboard. Remember,
there's no "H" in music!
.
.
.
RM110
.
Play this clip to review example 1-1 in the workbook.
.
.
.
RM111
.
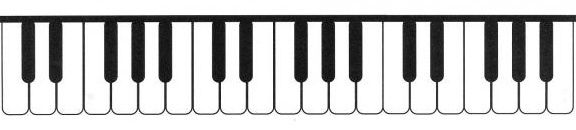
Play this clip to learn about a way you can practice learning the
names of the notes on the keyboard. If you look a little further down
the page, you will see a "Worksheets" button, and you can click that
button to bring up a file you can print that has the "blank" keyboard
pages you will use to do the practice exercise I talk about here.
.
.
Click on the "Worksheets" link to the left to open a PDF file that you
can print that contains copies of this blank keyboard that you can
practice with. Remember, the worksheet is going to open in a new
window (or tab), so you'll have to find it to print it. Close it when
you're done.
.
The worksheet contains a place to write in the names of the sharp and
flat keys - you haven't learned about those yet, but you will in the
next couple of sections, and then you can practice filling those in
as well!
.
Click on the "Answers" link to view a filled-in copy of our keyboard chart. It's
best if you print out the worksheet and fill in the answers yourself, but you can
look at my filled-in copy to make sure your answers are correct
.
.
RM112
.
Play this clip to learn about "half steps" and about what it means
to move "up" or "down" the keyboard. I also start to explain the names
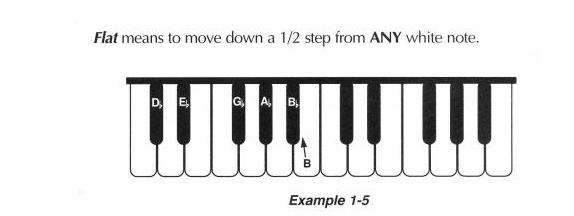
we give to the black notes on the keyboard.
.
.
.
.
.
RM113
.
Play this clip to learn about "whole steps." The black notes in this diagram don't
have names, but we'll explain all that soon...
.
.
.
.
RM115
.
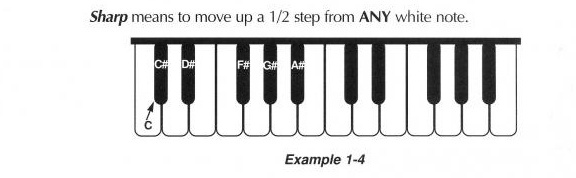
Play this clip to learn more about how we name "sharps" on the piano.
.
.
.
RM116
.
.
.
RM117
.
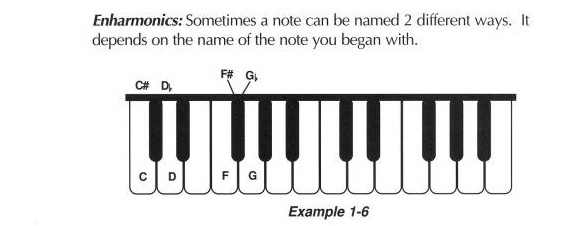
Play this clip to learn more about "enharmonics" - different names we sometimes use to describe
the same piano keys.
.
.
.
This is the first of three practice exercises. I explain a little bit
about "chords" and then we get to play some chords together. I really
encourage you to go through each of these exercises at least once - they
will give you a head start on some of the material we will cover later on!
.
RM118
.
.
.
This is another practice exercise we do with chords. While you play chords, I will "fancy up"
what we're playing so that it sounds more like a song.
RM119
.
.
For our last practice session, we'll learn about playing chords in
different "octaves." No doubt you've already seen that there are sets
of Twins and Triplets all up and down the keyboard - and that means
that there are many places where we can play a C chord.
.
RM120
.
.
.
Hooray, You Made It Through Lesson 1 !!!
Well... we covered a LOT of material in this lesson, didn't we? I hope everything
made sense - if you found yourself confused by those three "Practice" exercises
at the end, don't worry - I'll have a lot more to say about chords in the upcoming
lessons. But if you have questions about any of the other material, click this
button to send me an email and I'll try to answer your questions as soon as I can!

 Lesson 1: The Keyboard