In each of the lessons, you can click on this top logo to go to the index of lessons
Lesson 3: Major Scales
So far, we've learned a lot of things about the keyboard and about
musical notation, and how they relate to each other. We've learned how to
play a "C" scale using just the white keys on the piano and we've learned
a little bit about the black keys.
.
In this lesson, we're going to see what those black keys are used for, as
we learn to play scales in keys other than "C". Chords are built on major
scales - once we understand how scales are built, we'll be ready to
understand chords, and we'll be playing chords together!
.
.
RM133
.
Play this clip to hear a short introduction to this lesson.
.
.
RM134
.
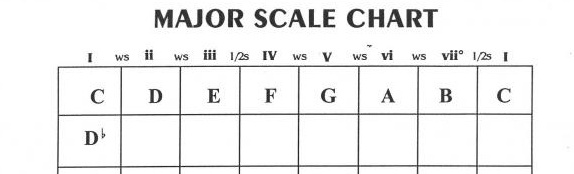
Click here as we get started on Lesson 3 and the Major Scale Chart. As
part of this lesson, we'll be filling in the Major Scale Chart, so to get
started, click on the Worksheets button just below and print out a copy
of the Major Scale Chart that you can write on.
.
Later on in this lesson, you'll be working on filling in the whole chart - so
pay attention while I explain how we do that!
.
.
Click on the button to the left to bring up a .pdf file containing the Major
Scale Chart, and print a copy to work with while you're going through this
lesson. It will come up in a new tab or a new window in your web browser,
so you may have to go look for it.
.
.
RM135
.
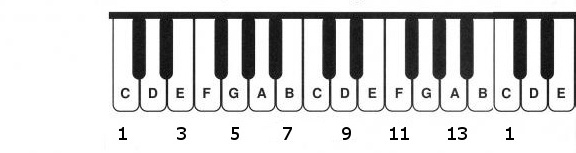
As we've already said, chords are built on scales, and the names of chords
are based on a numbering system starting with "1" - listen to this clip
to learn a little bit about this. (For future reference, be aware that
chord names that include that "7" note are tricky - we'll explain that
when we get to it; for now, we just want to learn about the major scales).
.
.
.
RM136
.
Before we work on filling in the Major Scale Chart, I want to play
the notes in the diagram just above for you. Play this audio clip and
just follow along. You don't have to play the notes yourself, just listen.
.
.
RM137
.
I've been talking about "triads" here - a triad is just a combination
of any three notes. Again, look at the numbered keyboard just above while
listening to this explanation of some of the more complicated chords...
.
.
RM138
.
Here's a little more information about chords and then we'll start talking
about major scales.
.
.
.
RM139
.
Before we go on, let's refresh what we learned before about half steps
and full steps:
.
.
.
.
RM140
.
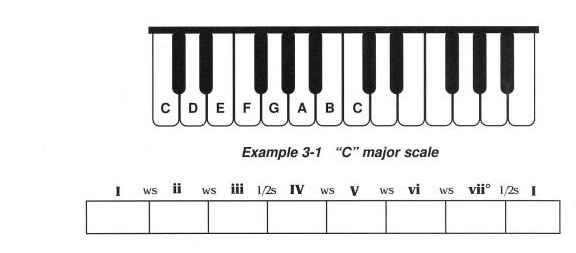
And so we're finally ready to build a major scale! Play the clip for an
explanation of the diagram below. On the lower part of the diagram, you
will see the roman numerals ( I, II, III, IV and so on - some upper case,
some lower case ) written above the boxes, with "ws" or "1/2s" between each
one.
.
.
.
RM141
.
Using the diagram above, and playing on your own keyboard, let's fill
in the chart above. I'll talk you through it. If you haven't yet, print
out the Major Scale Chart worksheet now. You will see that the notes for
the "C" scale, at the very top of the worksheet, have already been filled in.
.
.
.
RM142
.
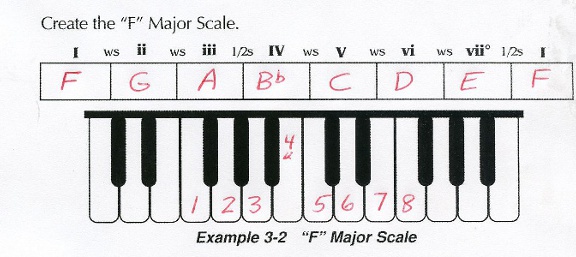
So now, take your worksheet and see if you can fill in the F Major scale.
For reasons you'll understand later, F Major and G Major are the simplest
scales after "C" - and you should definitely put off the Db scale until
you understand how this works. Remember, move up by half steps or whole
steps as the chart indicates - and for all the scales other than C,
that means that one or more notes are going to fall on a black key!
.
.
RM143
.
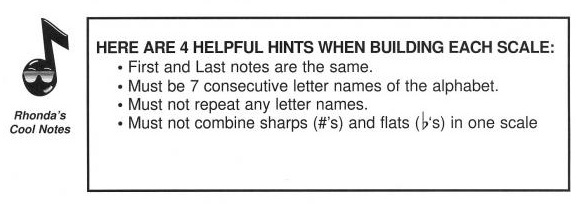
When you think you have the right notes written in, here are four helpful
tips that you can use to check your work to see if you did it right - without
just looking at the answers. Play the audio and we'll go over the four
tips on the notes you just wrote.
.
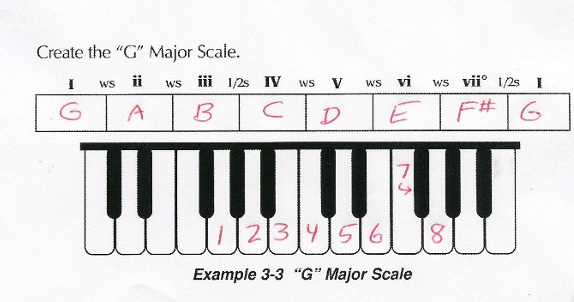
After checking your "F" scale, try the "G" scale - and then we'll go through together
and check your answers.
.
.
.
RM144
.
In this audio clip, we'll go through your answers for the "F" and "G"
scales together. If you filled in your answers on the big Major Scale
Chart, you won't have quite this much detail, but I'm giving you this
in hope it will help you understand the concept of building scales.
.
.
.
RM145
.
If you got the "F" scale correct, then you should have no trouble with
the "G" scale. If you didn't get it quite right, hopefully at least you
understand what went wrong, and you can do it now. Play this clip, and
we'll go through the "G" scale now.
.
.
.
RM146
.
The same pattern of half steps and whole steps works to create every
major scale. Before you work on filling in the whole Major Scale
Worksheet, though, let's play through some practice exercises in C,
G and F.
.
.
RM147
.
Let's start by playing the triads in the key of F major. Play this clip
and I'll help you play through the triads in the key of F major.
.
.
RM148
.
Let's do those chords one more time in the key of "F" - this time I'll play some background
music and you can hold each of your chords for four beats.
.
.
RM149
.
Now we'll do those same practice exercises in the key of "G" major.
Remember to play F# instead of F when you're in the key of "G".
.
.
RM150
.
And now I'll have you play the chords in the key of "G" - and I'll play some background
music while you hold each chord for four beats.
.
.
RM151
.
Now you've seen what it means to play "in a key" - to play just the
chords that use the notes in a specific Major Scale. It's actually
going to become a little more complicated than that, but for now, just
concentrate on understanding the chords we've been learning based on
the Major Scale notes.
.
.
RM152
.
Your "homework" this time is to fill in all the keys in the Major Scale
Chart. Click "Play Audio Clip" to the left to go over the explanation
of the assignment. Be sure you remember the Four Tips we looked at
earlier for making sure you filled in the notes of the scale correctly:
.
.
.
Here is a practice exercise that will help you relate the notes on
the staff to the keys on the keyboard - click the "Practice" button to view
and print out the worksheet. For each part of the exercise, look at the
key signature - the set of sharps or flats just to the right of the clef -
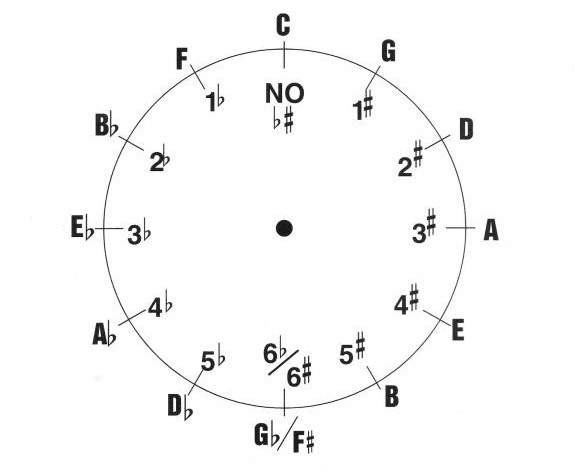
and figure out what key it is. Here is a diagram we'll be looking at in
Lesson 7 that will help with this part:
.
.
Now look at the notation. In the first example, there are three "sharps," and
if you go back to the things we learned about the Grand Staff, you'll see
that the first one (the one closest to the clef) is on an "F" note. So find
the F# on the keyboard diagram and write that in. The next sharp is on the
"C" line, so mark C#. The final sharp is on a "G" note - the sharp appears
way up at the top of the staff, but somebody decided that it looks prettier
to put that third sharp up there instead of on the "G" in the middle of the
staff. In any case, find the G# on the keyboard and mark that... and you're
done!
.
As you work through the various keys, you'll find that there is a
definite pattern to the way the sharps (and flats) appear in each key.
In every "sharp" key, the first sharped note is F#; in every "flat" key,
the first flat is Bb.
.
If you take the time to work through this worksheet, you will learn a lot
about key signatures and how the notes on the staff relate to the notes
on the keyboard. You don't have to finish this before moving on to Lesson
4, but keep it around and work on it whenever you have time.
.
And here is a set of drawings of the scales in different sharp and flat keys
that you can use to compare to the answers you got on your worksheet.
.
.
Just so you can check your answers for this lesson, click on the "Answers"
button to see a correctly filled in version of the Major Scale Chart.
You can also click
here
to see one more worksheet that identifies the correct piano keys to press
for a scale in each key.
.
When you return to the course index page (click the logo at the top of
this page, you will see that there is a link to a set of Practice exercises
for Lesson 3 (and some other lessons). I encourage you to follow that link
and go through these additional practice exercises to help you learn to
play the major scales on the keyboard.
.
.
Hooray, You Made It Through Lesson 3 !!!
Once again, we covered a lot of material. I hope everything made sense -
but if you have questions on any of the material from Lesson 3, click on
the "Ask Rhonda" button to send me an email. I'll try to answer your
questions as quickly as I can!

 Lesson 3: Major Scales